Managing IntelliJ Live templates
I primarily use IntelliJ for the majority of my work nowadays. This integrated editor and development environment offers numerous excellent features, one of which is the live templates feature. I have chosen to assist Jamal with the implementation of live templates.
Within this article, I will elucidate the methodology I have devised for editing and maintaining the live templates.
1. Problem Statement
IntelliJ supports the editing of live templates. It is designed to make the creation of live templates easier for beginners rather than being highly effective for power users. Solutions and usability can always be designed to prioritize ease of use for beginners or effectiveness for power users. Typically, these two aspects are mutually exclusive.
In the case of IntelliJ and live templates, it appears that the decision was made to prioritize the initial version.
To edit the live templates, you can navigate to the menu Settings → Live Templates.
The templates are organized by the language they are used in, and by selecting one or clicking on the plus sign to add a new template, you will be presented with a form to edit the different parts of the template.
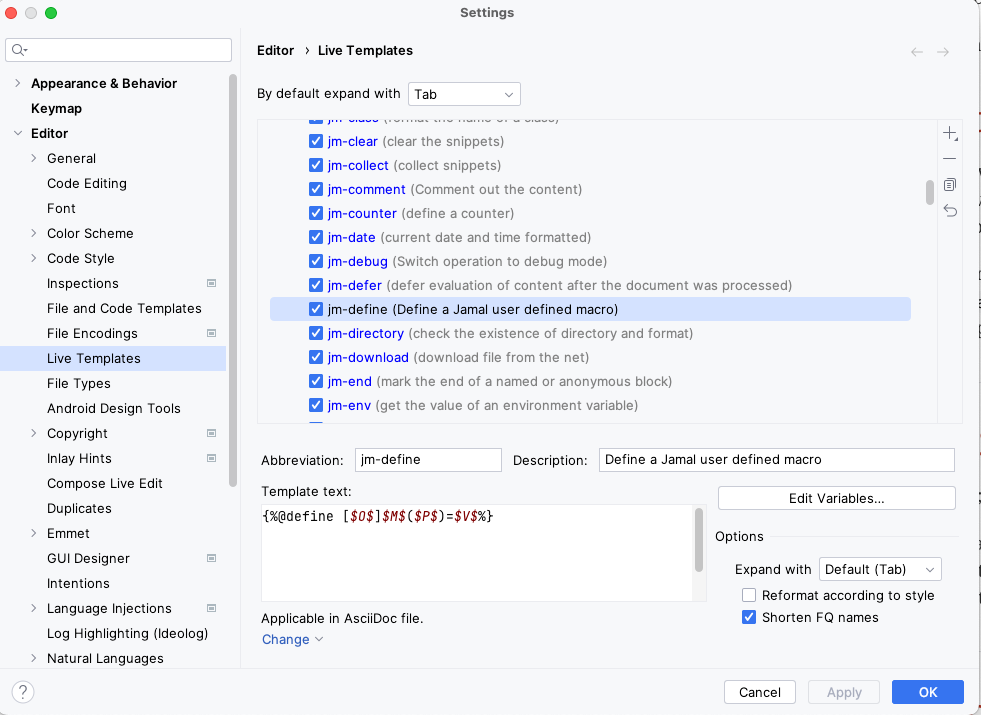
You have the ability to edit several aspects of the live templates:
-
Abbreviation: This is the text you type in the editor to trigger the template.
-
Description: A short text that appears in the popup when you type the abbreviation.
-
Template text: The actual content that gets inserted into the editor when the template is triggered.
-
Context: Specifies where the template can be triggered.
-
Variables: Parts of the template that can be edited when the template is triggered.
To save a template, you can click on either "Apply" or "OK," and then proceed to add a new one. However, when dealing with a large number of templates, such as the initial release that Jamal is working on, editing them can involve a significant number of clicks and mouse navigation.
This is not the only challenge, though. Maintaining the templates poses additional concerns. Live templates are stored in ZIP files, and uploading them to a repository makes them accessible to users. However, editing the templates and keeping track of changes can be tricky. How can you efficiently make modifications to the templates? How do you track and compare changes between different versions?
Programmers have become accustomed to tools that support them in maintaining program code, which is essentially text-based. Similarly, we desire the same level of support when it comes to maintaining live templates. How shall we reach that?
2. Approach to Solve the problem
The live templates are stored as XML files within a ZIP file. It is possible to import a ZIP file containing live templates, which will add the templates to the existing ones. Each group of templates is stored in a separate XML file. If a group with the same name already exists in the editor, it will be overwritten by the imported group.
One approach to editing the templates involves exporting them, modifying the XML files, and then importing them back. By keeping the expanded files in a version control system, changes can be tracked. The build process can generate the ZIP file from the expanded files.
However, this process is not ideal. Editing XML files is not preferred, as it can be cumbersome and unintuitive. Nobody wants to spend their time editing XML files, especially when there are other enjoyable activities to pursue, such as going to the gym, swimming pool, enjoying an apéritif, or having a barbecue, or spending time with their children. "I am going to edit some XML files, what a joy!" is not a phrase commonly heard (not to mention YAML!).
What we need is a better solution. We require a Domain-Specific Language (DSL).
In the following section, I will describe the approach I took to create a DSL specifically for this purpose and how I utilized it effectively.
3. Suggested Solution, Tools
Creating a DSL can be approached in various ways. The most well-known option is to use Groovy, which is frequently used for this purpose. However, Kotlin is also a viable choice. Notably, Groovy includes an XML builder structure that facilitates the creation of XML files.
In this particular case, I opted for a different approach, driven by several reasons.
The primary reason is that the live templates I developed are specifically for Jamal. Jamal can serve as a DSL and supports multiple integrations. One such integration involves running Jamal interactively while editing an Asciidoc file in IntelliJ using the Asciidoctor plugin.
With this setup, you can also edit XML files.
IntelliJ and the Asciidoctor plugin will recognize the file as an Asciidoctor file, but Jamal will identify it as both a Jamal and XML file.
When editing a file with the .xml.jam extension in IntelliJ, Jamal will save the processed XML into a file while simultaneously sending an Asciidoc document containing the XML as a fenced code block to the Asciidoctor plugin.
This allows you to edit the enhanced XML with macros in the left pane of the editor while observing the final, syntax-highlighted XML in the right pane.
There is no separate compilation phase involved.
When you edit the .xml.jam file, you are simultaneously modifying the XML file.
Creating the DSL is remarkably simple. You only need to define a few Jamal macros.
{%@sep {! !} %}
{!@define asciidoc:output=live-templates/templates/Jamal.xml!}
{!@comment This is a definition for the Jamal live macro templates for IntelliJ!}
{!@define template($name,$content,$desc,$variables)=
<template name="jm-$name" value="{%{!#if /{!@string:startsWith/$content/#!}//@!}{!@replace /$content/\n/ !}%}" description="$desc" toReformat="false" toShortenFQNames="true">
$variables
<context>
<option name="AsciiDoc" value="true" />
</context>
</template>
!}
{!@define variable($name,$default)=<variable name="$name" expression="{!@replace `///`$default///"///"!}" alwaysStopAt="true" />!}\To prevent conflicts with the Jamal plugin in Asciidoctor, the first line in the DSL sets the macro start and end strings to {! and !} respectively. By using these distinct macro delimiters, any potential clashes with the default {% and %} delimiters used by the Jamal plugin can be avoided. This ensures a smooth integration and usage of both the DSL and the Jamal plugin within Asciidoctor.
To clarify the process further, the asciidoc:output macro is used to specify the output file in the DSL.
Without this definition, the conversion from .xml.jam to .xml would create a file in the same location as the source file.
In addition to the asciidoc:output macro, two macros are used to define the template:
-
template: This macro is utilized to define the structure and content of the template. -
variable: This macro is used to specify the variables within the template that can be customized when the template is triggered.
These macros, namely template and variable, play a crucial role in creating and customizing the live templates within the DSL.
It is important to note that the abbreviation (name) of the live templates always begins with the letters jm-, which stands for Jamal Macro.
This prefix is used to avoid conflicts with existing live templates and follows the same practice as the Asciidoctor plugin, which uses ad- as a prefix for their live templates (where ad stands for Asciidoctor).
To simplify the editing process and reduce the risk of errors, it is undesirable to manually insert this prefix every time when working with the templates. Doing so would be a tedious and error-prone task. Therefore, the DSL provides a macro that handles this automatically.
The value attribute of the template element stores the text that will be inserted into the editor when the template is triggered.
The macro processing the content parameter is the following:
{%{!#if /{!@string:startsWith/$content/#!}//@!}{!@replace /$content/\n/ !}%}In the Asciidoc file, macros will begin with the {% delimiter.
However, just like the jm- prefix for live templates, we don’t want to type this delimiter every time.
Since these macros are not user-defined macros, they can be invoked using the @ or # prefix.
-
The
@prefix is used when there is no need to evaluate the content of the macro before the macro itself is evaluated. -
The
#prefix is used when the content of the macro needs to be evaluated before the macro is evaluated.
Typically, the @ prefix is used to optimize computing power and for aesthetic reasons.
|
Note
|
This notation was not taken from JavaDoc. Jamal’s first version, with this syntax, was designed in the mid-1990s, before or around the same time as Java was born. |
To avoid typing the @ prefix every time, a macro is implemented to automatically handle it.
However, in cases where the # prefix is needed, we want to be able to use it.
To handle this, the content is checked within the macro.
If the content starts with #, the @ prefix is not prepended.
Another macro called replace is used to replace escaped new line characters with their XML equivalents.
This feature was not part of the initial version but was developed to simplify editing multi-line templates, as it proved to be a handy addition.
Finally, the macro string closing %} is added to the template value to ensure proper syntax completion.
After defining these macros, the templates will have the following structure:
<templateSet group="Jamal">
{!template |begin|begin $M$|mark the beginning of a named or anonymous block|
  {!variable |M|"[marker]"!}
!}
...
{!template |platUml|plantUml ($O$) $I$ \n $C$|create a PlantUml diagram|
  {!variable |O|"folder=... format=... template=..."!}
  {!variable |I|"xyz.svg"!}
  {!variable |C|"..."!}
!}
</templateSet>
{!@xmlFormat!}
At the end of the DSL, the xmlFormat macro is used to format the resulting XML and also check for any errors.
With this macro, there is no need for a separate compilation phase to identify mistakes.
Any errors will be promptly displayed in the right editor pane, providing immediate feedback on the validity of the generated XML.
Additionally, the xmlFormat macro ensures that the XML output is properly formatted, enhancing readability and ensuring a well-structured final result.
When the editing process is ready, can zip the DSL, publish to the repository or import it into IntelliJ directly.
4. Summary and Takeaway
In this article, I have outlined a method for managing IntelliJ live templates using a DSL. While it may not be worth the effort if you only need to edit a few templates, it becomes more valuable when dealing with a larger number of them.
The key takeaway from this article is that the concept and approach demonstrated here can be applied to other applications as well. Whether you have a binary or text-based dataset that is difficult to edit directly, you can create a DSL using Jamal to simplify the editing process.
By utilizing a DSL, you can enhance productivity and streamline the editing of complex templates or datasets, making it easier to maintain and update them efficiently.
Jamal is an excellent tool for it.
5. References
I maintain the Jamal sources and documentation on GitHub:
The documentation for the Asciidoctor Jamal plugin can be found at:
This documentation provides instructions on how to install Jamal after installing Asciidoctor, as well as where to download the live templates.
Comments
Please leave your comments using Disqus, or just press one of the happy faces. If for any reason you do not want to leave a comment here, you can still create a Github ticket.